It took me nearly three years to finish this rug. Mostly because I would work on it, get bored, and forget about it. Repeat. But I finally decided that I had had enough of long, loose braiding taking up space in my room. I wanted that braid wound up and secure on my floor!
Unfortunately for those who have asked, I don't have a website I used as a guide. I'm pretty sure when I first got the idea I just googled "how to make a braided rug," read the first few instructions, figured out what were the common elements, then just went for it. I don't think I consulted anything in the interim between my impulsive plan and the final few stitches. That is not to say I didn't pick up a few tricks and tips along the way.
1. Google "how to make a braided rug" and read the first few hits you get. Decide what their common elements are and manipulate those to your own vision.
2. Pick out your fabric. I used: 1 bedsheet, 5 shirts, 1 pair of jeans, and 1 skirt. I highly recommend the bedsheet and the skirt, but for god sakes stay away from jeans unless you have good thimbles and the patience to wear them.
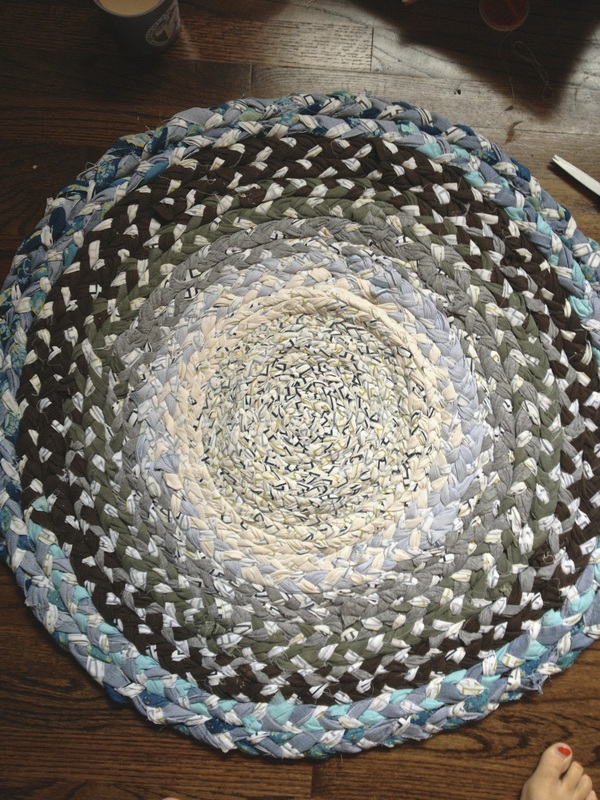
3. Cut everything in as long of strips as possible. (Hence the recommendation for bedsheets.) I think the website I first consulted suggested I cut the strips into 2-in widths. Let's just say there is no way I actually managed to do this. Cut them no thinner than 2in (unless you're doing jeans, but again, don't.) But the widths and the resulting braids kind of depend on the thickness of the actual material, not just the width of the fabric. If your rug is going to be made from all one material, then you're probably ok. But if your rug is anything like mine, you're going to kind of have to adjust as you go. I don't know if you can tell from the picture above, but the first inner rows are all of braids made from the sheet, which turned out really thin. The rows around the outside have stiffer fabrics and ended up with much wider braiding.
4. Braid. Braid and braid and braid and braid. I actually made one SUPER long braid before I even started stitching the rug together. When a strip ran out I simply stitched another one onto the end of it and kept braided. This made for some interesting lumps, most of which I was able to conceal on the underside of the rug. However, I think it would be possible to simply include the next piece of fabric by overlapping it with the previous piece and using the braid to hold it in place. This is also where it kind of comes in handy to have all your pieces cut the same width. It's not a huge deal if you don't (like mine), but again, it does result in some weird lumps and extra flappy bits of fabric.
Unfortunately for those who have asked, I don't have a website I used as a guide. I'm pretty sure when I first got the idea I just googled "how to make a braided rug," read the first few instructions, figured out what were the common elements, then just went for it. I don't think I consulted anything in the interim between my impulsive plan and the final few stitches. That is not to say I didn't pick up a few tricks and tips along the way.
1. Google "how to make a braided rug" and read the first few hits you get. Decide what their common elements are and manipulate those to your own vision.
2. Pick out your fabric. I used: 1 bedsheet, 5 shirts, 1 pair of jeans, and 1 skirt. I highly recommend the bedsheet and the skirt, but for god sakes stay away from jeans unless you have good thimbles and the patience to wear them.
3. Cut everything in as long of strips as possible. (Hence the recommendation for bedsheets.) I think the website I first consulted suggested I cut the strips into 2-in widths. Let's just say there is no way I actually managed to do this. Cut them no thinner than 2in (unless you're doing jeans, but again, don't.) But the widths and the resulting braids kind of depend on the thickness of the actual material, not just the width of the fabric. If your rug is going to be made from all one material, then you're probably ok. But if your rug is anything like mine, you're going to kind of have to adjust as you go. I don't know if you can tell from the picture above, but the first inner rows are all of braids made from the sheet, which turned out really thin. The rows around the outside have stiffer fabrics and ended up with much wider braiding.
4. Braid. Braid and braid and braid and braid. I actually made one SUPER long braid before I even started stitching the rug together. When a strip ran out I simply stitched another one onto the end of it and kept braided. This made for some interesting lumps, most of which I was able to conceal on the underside of the rug. However, I think it would be possible to simply include the next piece of fabric by overlapping it with the previous piece and using the braid to hold it in place. This is also where it kind of comes in handy to have all your pieces cut the same width. It's not a huge deal if you don't (like mine), but again, it does result in some weird lumps and extra flappy bits of fabric.
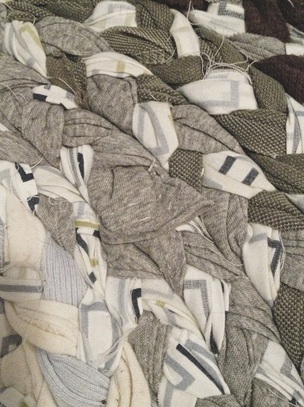
weird flappy bits (this is the top side of the rug)
5. Start stitching together. I started by folding the end of the braid in on itself and securing it. Then I wound it around and stitched some more, making sure the braid curved in a circular pattern. Honestly, my stitching on the back of the rug is a total mess. I'm not very particular when it comes to stuff like that, so some of my stitches are far apart and some of them are super close together. It's helpful to do them closer so your rug is more secure, but it takes way more time. I used a single piece of thread and just did a simple loop between the two side-by-side braids.
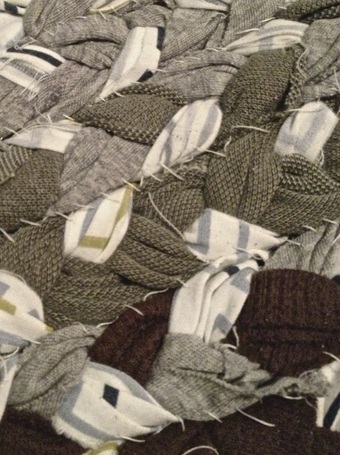
braid to braid stitching (bottom side of the rug)
As you can see, I didn't go all the way through the center of the braid nor did i repeat the stitching on the top side of the rug. As a result my rug is pretty loose (partly due to the fabric and the loose nature of the braids), which makes it fold pretty easy. But if you stitch it too loose the braids will push apart from each other when you set on them.
7. Make sure you do all your stitching on a flat surface. If the rug isn't totally flat while you try and do this, you will end up stitching it too tight, causing it to curl. I learned this the hard way. So if you're not up for hunching over on the floor or making sure you can have a cleared table big enough for a rug, I don't think this is the craft for you.
8. To finish off the rug I cut my fabric widths by half and made the braid tighter. This allowed for me to overlap it and stitch the very end of it onto the back, and makes it look like the braid just melts into the rug.
9. Because my braids and stitching were pretty loose I did a few spiderweb reinforcing stitches that started at the center and radiated out to the edges. I made these from double stranded thread for extra hold.
That's pretty much it! Clearly an amateur attempt and something I probably won't be repeating any time soon. But it was fun and now I have something cool to show for it! Also please forgive the lame pictures: I don't know where my camera charger is and I wanted to do this quickly. Feel free to facebook or comment with any other questions you might have!
 RSS Feed
